Optomechanical Accelerometers
The Technology

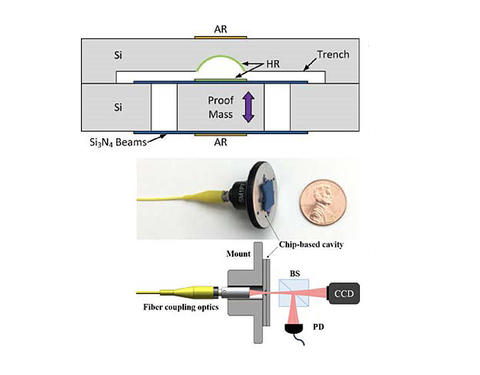
A NIST team is pioneering development of a revolutionary optomechanical accelerometer that uses a microscale optical cavity to detect the extremely small motion of a mechanical resonator caused by an acceleration. This sensor is designed to be intrinsically self-calibrating, thereby avoiding the need for periodic calibrations and expensive calibration equipment.
The prototype, including the optical cavity and mechanical resonator, is only 1 mm thick and is designed to deliver measurements with uncertainties better than 1 part in 1,000 without calibration — exceeding primary acceleration calibration systems operated at national metrology institutes. Almost all commercial accelerometers have uncertainties that are much greater before calibration.
Accelerometers typically function by measuring the motion of a “proof mass” with respect to a fixed local reference. For example, the mass might move to compress a piezoelectric material, generating a current, or it might stretch a piezoresistive element so that its electrical resistance increases.
The NIST sensor consists of a tiny Fabry-Pérot optical cavity made of silicon. At one end of the cavity is a fixed hemispherical mirror about 300 µm deep, 500 µm wide, and with an average surface roughness of 1 nm. At the other end, about 250 µm away, is a mirror-coated silicon plate 500 µm thick that is suspended in the cavity by flexible silicon nitride support beams. The length of the beams, together with the dimensions of the proof mass, determine the fundamental resonance frequency of the mechanical structure, which is designed to be greater than the acceleration frequencies of interest.
Light from a tunable laser is sent into the cavity and is reflected between the two mirrors. A single optical fiber carries both the incoming and reflected light. Optical resonances occur when the cavity length is an integer multiple of one half of the laser wavelength, resulting in a reduction in reflected light on resonance. These optical resonances provide a highly sensitive transduction method for measuring displacement by detecting the variation in light reflected from the cavity.
When the device is at rest or moving at a constant velocity, the cavity length remains constant. When the device is accelerated, however, the suspended mass is displaced either toward or away from the fixed mirror, changing the cavity length. That change in cavity length shifts the optical resonance, causing the amplitude of the reflected light to change. This optical signal can be accurately converted to a displacement since the stable wavelength of the laser can be used as a length standard. The displacement can then be converted to acceleration using a simple harmonic oscillator model of the mechanical resonator.
Advantages Over Existing Methods
Conventional accelerometers are electromechanical — that is, they output an electrical signal generated by mechanical motion of the proof mass through charges generated in piezoelectric materials, changes in electrical resistance or related means. These types of accelerometers must be calibrated, typically by placing them on a shaker table and correlating the measured shaker table motion with the electrical output of the sensor.
Because the optomechanical accelerometer relies on fundamental principles of optics and makes use of a highly stable laser for transduction, it is intrinsically self-calibrating. And because the components are the same size as those routinely produced in microelectronics or MEMS fabrication, the eventual production cost of a complete unit with associated electronics, approximately 1 cm3 in size, should be low.
Applications
For many applications in the modern world, accurate accelerometers are critically important. They monitor shock and vibration in machinery on the factory floor and in civil infrastructure, such as bridges and buildings. They provide a gauge of seismic activity for early detection of earthquakes and for oil and gas discovery. They are also used for navigational guidance in satellites, spacecraft, missiles and self-driving cars, particularly when GPS service fails or is unavailable.
The design of the optomechanical accelerometer is highly scalable and is expected be beneficial in all the applications above. Furthermore, it may also be used as a reference accelerometer that can calibrate other accelerometers without the need for NMI calibration services. The design concept of the accelerometer is also likely to be useful for many other important measurements, including force, pressure and sound, with equally high sensitivity and precision.
Key Publications
Y. Bao, F. Zhou, T.W. LeBrun and J.J. Gorman. Concave silicon micromirrors for stable hemispherical optical microcavities. Optics Express. June 23, 2017. DOI: 10.1364/OE.25.015493
F. Zhou, Y. Bao, R. Madugani, J.J. Gorman and T.W. LeBrun. A Fiber-Pigtailed Hemispherical Fabry-Pérot Microcavity for Accelerometry and Sensing. Frontiers in Optics/Laser Science, OSA Technical Digest. Sept. 2018. DOI: 10.1364/FIO.2018.JW4A.90
R. Madugani, F. Zhou, R.P. Wagner, Y. Bao, J.J. Gorman and T.W. LeBrun. Acoustical Response Characteristics of an Optomechanical Accelerometer. Frontiers in Optics/Laser Science, OSA Technical Digest. Sept. 2018. DOI: 10.1364/FIO.2018.JW3A.88
Y. Bao, F. Zhou, T.W. LeBrun and J.J. Gorman. A silicon optomechanical accelerometer with high bandwidth and sensitivity. Hilton Head Workshop 2018: Solid-State Sensors, Actuators and Microsystems Workshop. June 3, 2018.
Y. Bao, F. Zhou, T.W. LeBrun and J.J. Gorman. A photonic MEMS accelerometer with a low-finesse hemispherical microcavity readout. International Conference on Optical MEMS and Nanophotonics. Aug. 2017. DOI: 10.1109/OMN.2017.8051490
Y. Bao, F. Guzmán Cervantes, A. Balijepalli, J.R. Lawall, J.M. Taylor, T.W. LeBrun and J.J. Gorman. An optomechanical accelerometer with a high-finesse hemispherical optical cavity. IEEE International Symposium on Inertial Sensors and Systems. Feb. 2016. DOI: 10.1109/ISISS.2016.7435556
Contacts
-
(301) 975-4256
-
(301) 975-3446

