
Official websites use .gov
A .gov website belongs to an official government organization in the United States.
Secure .gov websites use HTTPS
A lock (
) or https:// means you’ve safely connected to the .gov website. Share sensitive information only on official, secure websites.
Initialization
A trajectory is initialized in the Init and Properties blocks.
Properties
The Properties block has expressions for defining how and when files will be named and written (see File Rule) and what the 1D plotting conventions will be (see Data-of-Interest), as well as other metadata relating to the trajectory. Properties cannot be scanned – meaning, they cannot be a part of any loop.
Below are general properties that can be populated prior to a trajectory running:
- description
- A description of the trajectory.
- editor
- Qualifier to identify whether the trajectory has been created automatically or not. The value of this property is auto-generated by the trajectory manager.
- fileName
- filePrefix
- entryName
- fileGroup
- trajName
- The above properties are all related to how and when data files are named/created. To learn more about these properties, see File Rule.
The following set of properties determines how data is plotted in the 1D plotter:
- yAxis
- This property represents the “data-of-interest.”
- For example, if neutron counts are considered the data-of-interest, then counts or the count rate would be chosen for the yAxis property.
- xAxis
- This property typically represents the device that is being scanned.
- For example, the xAxis may be set to the position of a motor, temperature of a controller, etc.
- normalize
- This property basically signifies the number being dividing by to achieve some numeric understanding of the yAxis.
- For example, dividing by a “time” number to transform counts into count rates.
Init
The Init block is found below the Properties block and defines the general context in which loops are to be evaluated, including the instrument state at the start of every scan. Basically, it is where the user moves nodes to specific values as a one-time operation before measurements are taken. It is also where the user sets global parameters for the trajectory.
NOTE: It is important to reiterate that Init will only update/move devices BEFORE the scan is performed.
Init is prepopulated with the given instrument’s devices and their associated nodes. Custom variables can also be added to Init. To learn more about the difference between device node variables and custom variables, see Namespace and Variables. A custom variable is typically set to a function which evaluates to a value, possibly based on device node values and other custom variables inclusive to a scan. To learn more about using functions, see Functions.
To illustrate Init’s use less abstractly, let’s look at how it is used to setup counters.
If the counter settings will not be changed throughout scans, then it is best to set up the counter beforehand as a global standard for counts. Withholding the need for loop-specific count conditions, Init is typically where counters are set up. That said, if the counter has been setup in Init and then a loop sets up its own counter, this loop’s local counter conditions will overwrite the globally-designated conditions in Init and counts will proceed with the new conditions with that loop and moving forward. To learn more about setting up counters for a trajectory, see Counters.
For example,

the above case shows the counter getting set to run against time, 10 seconds per point, specifically. The "slitAperture1" loop steps through its points and counts for 10 seconds at each. Then, the counter's preset gets changed to 20 seconds in the "slitAperture2" loop - this means that both "slitAperture2" and "slitAperture3" will count for 20 seconds at each point they step through. In essence, the counter gets redefined globally whenever it is accessed, whether that is within the Init block or a loop. To have the counter return to a 10-second preset, it would need to redefine the variable again, as in the example below:
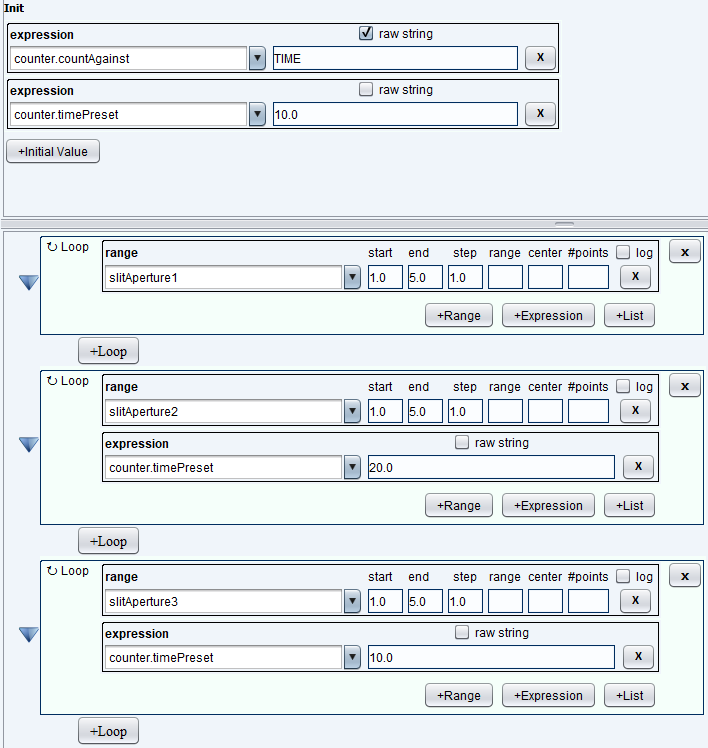
Now - if you wanted to have a different preset for every loop, then you might jump to the conclusion that you have to redefine the counter preset for every loop. Although that is a possibility, it's actually uncommon to use a static number for the counter preset in scans. Typically, scans are run with their counter's preset being set to an expression (which can be a function) that evaluates at every loop or point. With a formula that evaluates to different values, it's unnecessary to ever redefine the preset - hence, why the counter is setup once and beforehand in the Init block.
The same logic for setting up counters in Init applies to defining functions – if you will be using a given function throughout scans, then it’s best to define it in Init.
Some useful nodes that can also be set in Init include:
- waitPoint
- This node allows the user to add a pause between measurements. NICE will move the necessary motors (nodes), wait the specified time (in seconds), then count (user specified time).
- skipPoint
- This node allows the user skip points of measurement. NICE will move the necessary motors (nodes), measure points (ex. temperature range 100 - 500 K, steps of 100 K), skip the specified point (ex. T = 300K), move to the next point (ex. 400K), then count (user specified time).
- skipCount
- This node allows the user to skip an entire count in a trajectory. NICE will not move the motors associated with the count being skipped – it will move motors for the next executable count.
IMPORTANT! When setting a node in the Properties and Init sections, take note that there is a checkbox titled “Raw String”. Checking or unchecking the box changes how the text written in the field will be evaluated. The following example illustrates this difference:
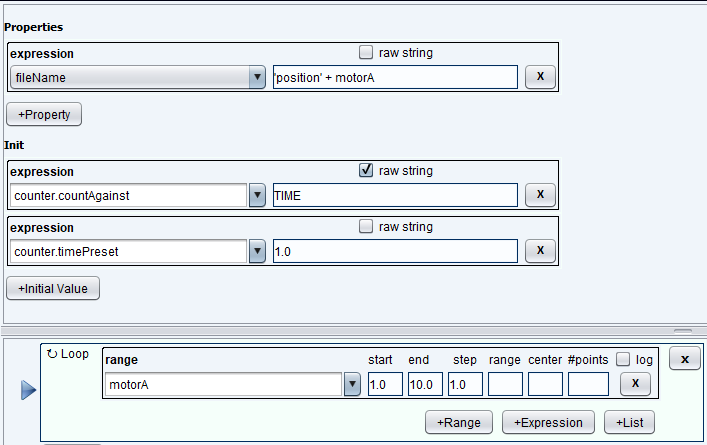
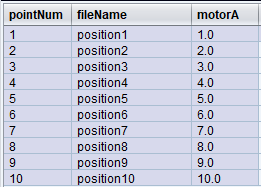
“Raw String” defaults to being unchecked. In this case, NICE evaluates the node and reads the value of that node. Above, we have the fileName property being set to the word “position” and a motor position. NICE will evaluate the value of “motorA”, concatenate it with the word “position”, and set the fileName node with the result.
When the “Raw String” option is unchecked, putting single quotes around a word will designate it as being a String – such as the word “position” in the above example.
However, if “Raw String” is checked, then NICE will treat “motorA” as a String – in fact, anything within the field underneath the checkbox will now be considered a String. This will put “motorA” in every file name for each data file. Each file name will say include “motorA” in it, like below.
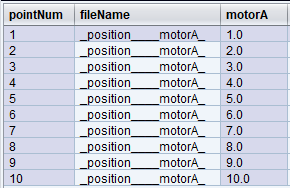
The underscores within the filename are subbed in for any spaces, quotes, or special symbols (such as the + sign).
Finally, if the scan you’re conducting is complicated (such as having different count conditions set for every loop) or beyond what the trajectory editor allows, then you’re better off using a Python script. To learn more about scripts, see Scripts.