
Official websites use .gov
A .gov website belongs to an official government organization in the United States.
Secure .gov websites use HTTPS
A lock (
) or https:// means you’ve safely connected to the .gov website. Share sensitive information only on official, secure websites.
Sample System
NICE provides a tool to manage sample information. You can build a custom list of properties which will be used to define samples in a way that is useful for a given experiment. You can create an arbitrary number of samples within each experiment and specify which one is active (in the beam). Information about the active sample is written to data files.
Sample Table Panel
This panel allows you to define samples and their properties.
Note: For SANS instruments some sample information is contained within the "Sample Times" panel.
Basic Sample Controls
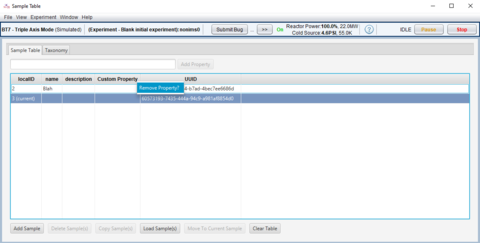
Each row of the Sample Table defines a sample. The basic controls are as follows:
- "Add Sample" - Creates a new sample. Each new sample is automatically given a unique localID and UUID (described below). Additionally, the first sample which is created is automatically made the active sample.
- "Delete Sample(s)", "Copy Sample(s)" - Delete or copy selected samples.
- "Clear Table" - Removes all samples from the table.
- "Make Selected Sample Active" - Makes the selected sample active by moving sampleId --> localID for that sample. Additionally, the active sample's row is highlighted in this table and the localID column will contain the additional text "(current)".
Sample Properties Tab
Each column in the Sample Table holds the values of one property across all samples. Every sample has the following permanent properties:
- localID - A short, easy to type, ID which is unique within any given experiment.
- name - name of the sample
- description - detailed sample description
- UUID - unique id, which is never rest
You can create custom properties, which appear as additional columns in the table. To add a custom property type the name of the property in the input box and click "Add Property" button. A new column will appear.
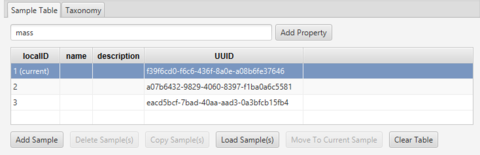
As you type in the input box, you'll see predefined properties appear, which you can choose instead of creating your own. The special properties are defined as part of taxonomies, which are described in the next section.
You can remove properties by right-clicking on a given column header and choosing "Remove Property".
Taxonomy Tab
You will often add predefined properties in logical groups called taxonomies. These groups contain the set of properties needed to describe samples of a given type. You can access taxonomies via the "Taxonomy" tab in the panel.
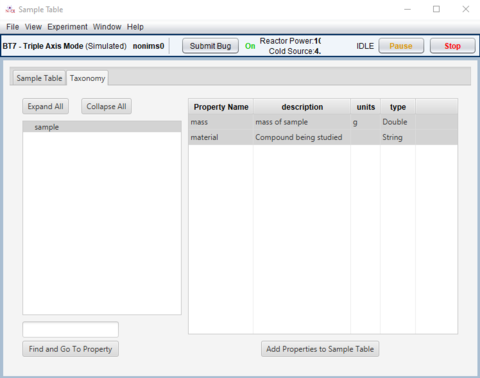
The box on the left lets you choose a taxonomy of interest to add to your sample properties for the experiment. This can be an arbitrarily complex tree, which is defined, per instrument, by the instrument scientists. You can search for individual properties by typing below and pressing the "Find and Go to Property" button.
The box on the right shows all the properties (columns) which will be added and even allows you to choose a customized sub-set. Pressing the "Add Properties to Sample Table" button actually adds these properties to your experiment.
Note: The file which defines an instrument's taxonomy tree is: instrument_configs/<instrument_name>/taxonomy.json
Importing/Exporting
You can import the samples and properties in the sample table from a CSV file by pressing the "Import Samples and Properties" button. The first row of your imported file should contain a list of property IDs, which define the imported samples. Each subsequent row should define the values you want to import for a sample.

When you import, each sample row (rows past the first, properties, row) will be added as a new sample. Additionally, any properties, defined in your import file, which are not already in your sample table, will be added as additional columns.
Explicit UUID - You can explicitly define a UUID column in your sample file to force the imported samples to have a specific UUID. This is useful if importing pre-existing samples from another instrument/experiment. Note: You CANNOT use a UUID, which is already defined in your sample table. If you do, the corresponding row will be ignored and you'll get a warning.
"Export Samples" (Future) -- exports sample table into (CSV) text file (not implemented yet).
Active Sample
The sampleId.primaryNode node (or just sampleId) defines the active sample, which sample NICE considers to be in the beam. This node's value is a number corresponding to the value of the localID property of one of the samples. It can also be 0 which denotes that no sample is active. This node has two main uses:
- When NICE writes a data file it will record the properties of the active sample in the data file. By changing this, you'll be able to track what sample you were measuring in any given data file and even search for your files later using this information.
- On some instruments, moving sampleId may move motors to physically put a specific sample into the beam. Talk to your instrument scientist about how this works on your instrument.
You can also change the current sample from the Sample Table with the "Make Selected Sample Active" button.
Note: When you create the first and only sample, in the table, it automatically becomes active (sampleId is set to match its localID).