
Official websites use .gov
A .gov website belongs to an official government organization in the United States.
Secure .gov websites use HTTPS
A lock (
) or https:// means you’ve safely connected to the .gov website. Share sensitive information only on official, secure websites.
Features of the Wall
Construction Features

The wall is approximately 12 m long, 4 m high, 0.6 m thick at the bottom, and 0.3 m at the top. The front face is oriented to the South and includes a granite base, limestone coping, marble quoins on the West end, and sandstone quoins on the East end.
The stone facing varies in thickness, most of the blocks below Course 5 being 13 cm or more thick, and above Course 4, 10 cm or less. The divider strip extends 20 cm into the wall. The D.W. Kessler and R.E. Anderson 1951 NBS Building Materials and Structures Report 125 provided the following diagrams and construction details.
Front Face (Heading South)
The following two diagrams show the numbering scheme of the stones in the front face of the wall:
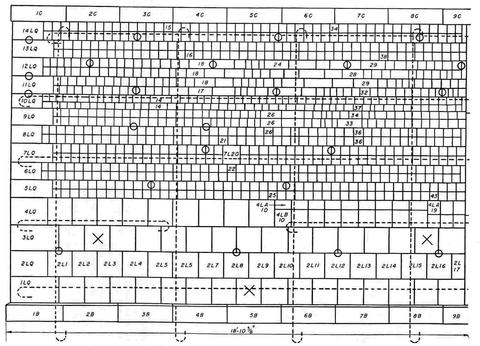
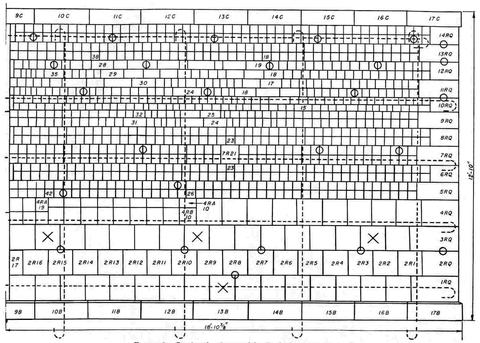
The first number signifies the course, counting from the base upward. For example, L13 indicates the 13th block from the left, and R13 the 13th block from the right. In counting from either left or right, the quoin (end stone) should be disregarded. The number of courses is determined by the quoins, there being 14 courses in addition to the base course and coping (top course). Above Course 4, there are two rows of small stones, the upper row designated A and the lower one B. Thus, 5LA7 means the 7th block from the left quoin of Course 5 upper row, and 6RB9, the 9th stone from the right quoin in Course 6, lower row. Base blocks are designated 1B to 17B, numbered from left to right. The coping blocks are likewise designated 1C to 17C in the same order. Quoins on the left are designated 1LQ to 14LQ, and those on the right, 1RQ to 14RQ, number from bottom to top. The divider strips are called 1D, 2D, and 3D, from bottom to top.
The wall is built on a concrete foundation extending 0.7 m below grade. Grade waterproofings under the base course are (1) two layers of 0.6 cm Virginia slate, laid with broken joints in cement mortar under base blocks 1B, 2B, 3B, 15B, 16B, and 17B; and (2) one layer of 18-oz. copper under base blocks 7B, 8B, 9B, 10B, and 11B. Both slate and copper extend 0.5 m into the wall and the intervening sections of the base course have no grade waterproofing. The stonework was built up in sections about 0.6 m high, after which the concrete backing was poured to this level.
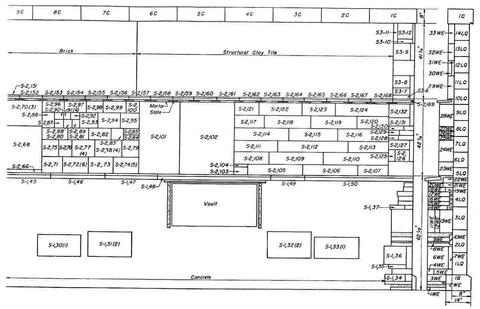
The back surface of the stone facing above the copper grade waterproofing was treated with a brush coat of asphalt emulsion, which was allowed to dry before the concrete was poured. The concrete backing was reinforced as shown in Figure 2, and perforated 18-gage galvanized iron strips were used at frequent intervals to tie the stone facing to the concrete backing. The locations of these strips are also shown in these figures.
Two types of stone-setting mortar were used in the front of the wall. All stones above the base in the east half were set in a 1:3 lime mortar, using a high calcium hydrate. The other parts, including the stonework on the back of the wall, were set in a 1:0.4:3 portland cement, whiting, and sand mortar. All stones set in lime mortar were wedged at front and back to prevent settling and the wedges were left in place for about a week before removal. The consistencies of the mortars were judged by the mason and both mortars had excellent workability. The vertical joints were poured full, and for these a creamy consistency was used. All joints in the south face of the wall were raked out to a depth of 1 inch before the mortar had set. After all stones in this part of the wall had been set, the joints were pointed with mortar of the same mixtures as those used in the setting, that is, lime mortar for the right half and cement mortar for the rest. A pointing tool of rounded contour was used to obtain slightly concave joints.
Back Face (Heading North)
The following two diagrams describe the numbering of the back face of the wall:
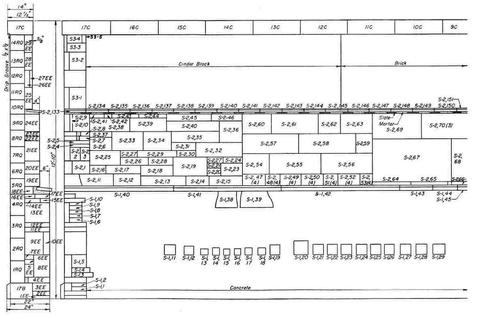
The back of the wall has two set-backs, the tops of which are covered with thin stones forming water tables; the first, or lower table, with two varieties of sandstone flagging, and the second with 37 small marble slabs. Up to the first water table, the back of the wall is concrete except for 23 blocks of granite, which were set in the concrete when it was being poured. Between the first and second water tables, the wall is faced with sandstone and granite. Some thin slabs were used on the back of the stone facing for testing discoloration effects.
The ends of the wall are faced with sandstone, limestone, and granite of miscellaneous sizes and shapes. Under the vertical joints between the marble slabs forming the second water table, thin pieces of slate were set to prevent leakage and discoloration of the stone below.
Wherever metal strips were used to anchor the stone facing to the backing, they were set into the back parts of the stone joints with cement mortar like that used in the left half of the wall. It was necessary to build up the backs of a few thin slabs of stone facing with brick in order to support the thicker blocks above. The locations of these brick back-ups are shown in the figure above.
The wall was built by the Louis Perna Co. of Washington, D.C., with one mason, Vincent Di Benedeto, setting all the stonework. He was an exceptionally careful workman and took a special interest in doing a thorough job. William Amoroso, who had charge of the work, devised several experiments of his own on the back of the wall. The contractor supplied most of the stone for this face.