Results for CHAL-AMB2018-01-RS: Part Residual Strains
Results for CHAL-AMB2018-01-RS: Part Residual Strains
Energy-dispersive X-ray diffraction measurements
1. Overview
Energy dispersive diffraction experiments were conducted for an IN625 specimen on the ID1A3 beamline at the Cornell High Energy Synchrotron Source (CHESS). The incident X-ray beam was masked to a 0.25 mm × 0.25 mm cross-section by a pair of incident beam slits. The beam was diffracted through two sets of slits with a fixed 2θ angle of 9.18°. The multiple slit geometry results in a ‘rhomboidal’ shaped diffraction volume of 0.25 mm × 1.5 mm × 0.25 mm, where the long dimension is along the y dimension of the sample. Diffraction data were collected over the X-Z plane at the mid-point in y. The measurement locations for the lattice strains are illustrated in Figure 1.

2. Summary Results
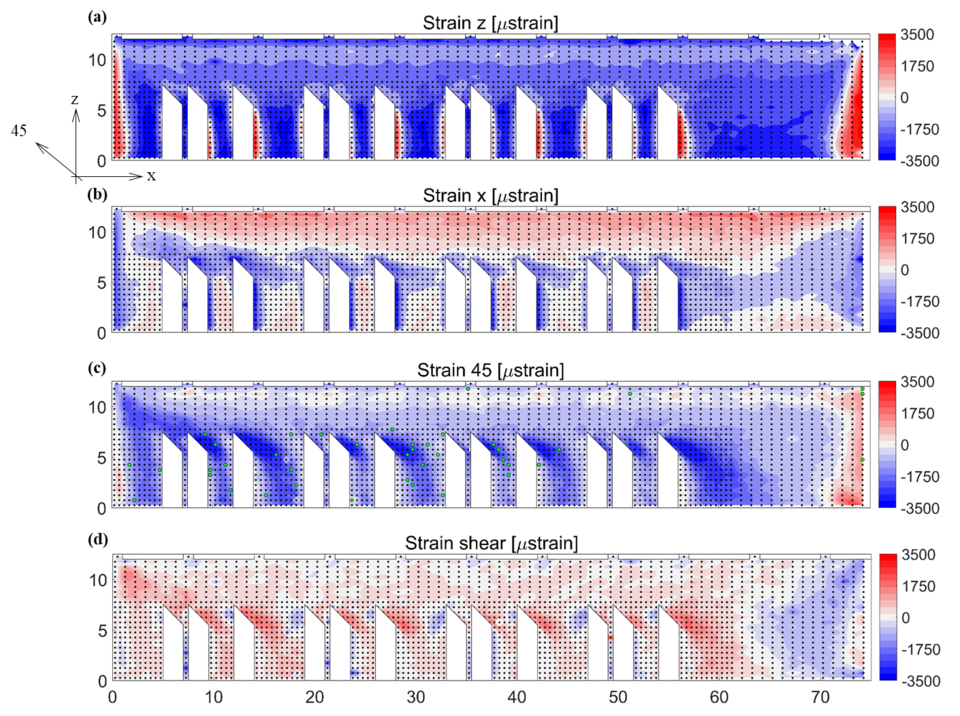
Figure 2 shows the lattice strain components of the strain along the (a) build direction (z), (b) the longitudinal strain (x), (c) the z-x strain at 45o and (d) the shear strain (γxz). The γxz was calculated by using the equation γxz = 1/2 (εxx + εzz) - εzx.

3. Data Files
The lattice strain components along the X, Z and the Z-X at 45o for the IN625 specimen are presented in a data table as a tab-delimited text file. The text file contains six columns, indicating the X position, the Z position, the εxx, the εzz, the εzx(at 45o) and the γxz. The X and Z positions indicate the location (in mm) of the center of the measurement gauge volume, with the origin set at the bottom left corner of the X-Z plane. This data file and figures showing all measured strain components are available in a data publication at https://doi.org/10.18434/mds2-3052. When using these data, please follow the citation instructions on the data publication landing page.
These results are also described in a journal publication:
Phan, T.Q., Strantza, M., Hill, M.R. et al. Elastic Residual Strain and Stress Measurements and Corresponding Part Deflections of 3D Additive Manufacturing Builds of IN625 AM-Bench Artifacts Using Neutron Diffraction, Synchrotron X-Ray Diffraction, and Contour Method. Integr Mater Manuf Innov 8, 318–334 (2019). https://doi.org/10.1007/s40192-019-00149-0.

