X-rays from Copper Source Set New Gold Standard for Measuring Industrial Materials
World’s most accurate measurements of important X-ray spectrum could advance applications from infrastructure to drugs.

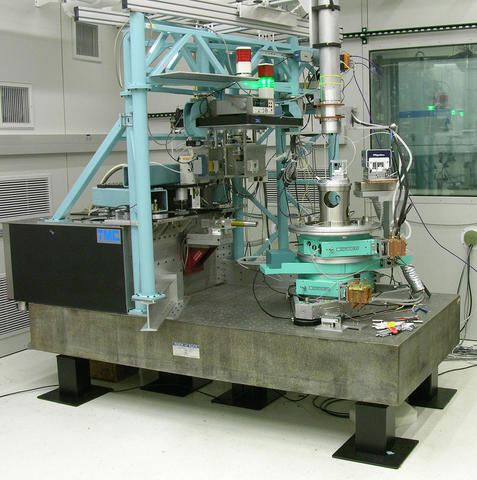
NIST's new X-ray machine for high-precision measurement of the Copper Alpha spectrum, shown here in its 0.01 degree Celsius temperature-regulated space.
Researchers at the National Institute of Standards and Technology (NIST) have produced and precisely measured a spectrum of X-rays using a new, state-of-the-art machine. The instrument they used to measure the X-rays took 20 years to develop, and will help scientists working at the agency make some of the world’s most accurate measurements of materials for use in everything from bridges to pharmaceuticals. It will also ensure that the measurements of materials from other labs around the world are as reliable as possible.
The process of building the instrument for making the new measurements was painstaking. “This new specialized precision instrument required both a tremendous amount of mechanical innovation and theoretical modeling,” said James Cline, project leader of the NIST team that built the machine. “That we were able to dedicate so many years and such high-level scientific expertise to this project is reflective of NIST’s role in the world of science.”
“The wavelength of an X-ray is a ruler by which we can measure spacings of atoms in crystals,” said Marcus Mendenhall, lead author of a new paper in the Journal of Physics B: Atomic, Molecular and Optical Physics that applies the new instrument to the measurement of the copper X-ray emission spectrum. “We now know the length of our ruler better, and all kinds of materials can now be measured with improved accuracy.”
The new machine will allow researchers to link measurements of the lattice spacings with greater confidence to the definition of the meter in the International System of Units (SI). It is the comparisons to the SI meter that allow for quality assurance at the smallest and most precise levels.
The researchers’ measurements were consistent with results from the past 40 years and captured new details of the X-ray spectrum. In addition to the lattice spacings, all of the elements that went into making measurements were fully traceable to the SI, assuring the accuracy and reliability of the measurements.
X-ray work is often associated with medical care, but X-ray instruments are also widely used in commerce, as they can help to identify and characterize a broad range of common substances, including cement, metals, ceramics, electronics and medicines.
In both medical and industrial applications, X-rays provide scientists with a way to see inside matter. In the case of injured humans, that might mean looking inside a body to see problems such as broken bones. X-rays are also used, however, to view the atomic structure of substances via a method known as diffraction.
Powder diffraction—which involves grinding a substance and placing it into a precision X-ray machine for analysis—has become a ubiquitous analytical technique in science. There are now more than 30,000 laboratory diffractometers being used to view crystals using X-rays with powder diffraction methods around the world. In addition, there are several hundred powder diffractometers worldwide that utilize nonconventional types of radiation such as those from synchrotron and neutron sources.
NIST produces Standard Reference Materials (SRMs) for industry and academic research, and they are essential for quality assurance programs and to verify the accuracy of specific measurements. The agency also produces reference values needed for calibrating laboratory X-ray instruments worldwide. This new, high-precision machine will play a large role in the future of both enterprises.
The X-rays the new instrument produces, the K-alpha lines of copper, are no different from those produced by countless other X-ray machines. They are produced by firing electrons at a copper target. What is different, however, is that years of engineering and calculation have brought forth an instrument that can scan a full circle around the sample with extraordinary accuracy. Additionally, it is equipped with an X-ray camera that gives much richer information than traditional detectors, and provides self-consistency checks for alignment of the sample and reduces systemic uncertainties. The instrument was constructed in a subterranean laboratory featuring a closely controlled temperature, which allows for extremely accurate measurements.
One of the team’s proudest accomplishments was the instrument’s well-characterized goniometer, which is the part used for the measurement of the angles between the faces of crystals that make up typical samples of solid materials. The machine is calibrated using the circle closure method, a technique that uses multiple comparisons of the differences between two or more angular scales, repeatedly rotated with respect to each other to determine the measurement uncertainties in each scale. This, in conjunction with wide scan range, allows accurate measurement of the angle between the crystals and, therefore, the X-ray spectrum, without disturbing crystal alignment.
Mendenhall and Cline are now planning to update the measurements of many SRMs as well as other important X-ray lines (from materials other than copper) in the NIST catalog using their new machine. That process will take time, since this kind of X-ray measurement can take weeks or even months. Fortunately, most of the task only involves a small amount of human interaction, since the machine is automated once a measurement has begun, allowing the scientists to continue researching other topics while the machine does its job.
“The goal was not to make a machine that the rest of the world and commercial entities can imitate and make themselves, but rather, to make a machine that can give everyone the best answer to measurement questions,” said Mendenhall.
Paper: M. Mendenhall, A Henins, L. Hudson, C. Szabo, D. Windover and J. Cline. High Precision measurement of the X-ray Cu Kα spectrum. Published online May 12, 2017. Journal of Physics B: Atomic, Molecular and Optical Physics. DOI: 10.1088/1361-6455/aa6c4a

