Sheet Metal Forming Facility
Facilities
We have developed an instrumented forming station capable of measuring the stress in sheet metal during deformation. This capability makes it possible to map the evolving yield surface of next-generation alloy sheet metal of interest to the automotive industry.
Significance
Autobody and other sheet metal components are currently designed using a strain-based methodology. While this method has been suitable for conventional sheet steel, lighter weight, advanced metals will require a design methodology based on the stress in the part being formed. In response to this need, we have designed and constructed a sheet metal forming facility that permits in situ measurement of the stresses in sheets as they undergo complex deformations typically found in forming operations.

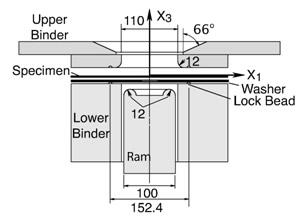
The Marciniak geometry used in the forming station
The forming station uses a modified Marciniak geometry, in which a 100 mm diameter ram deforms the sheet specimen biaxially. Both the ram and the clamp are rated for 500 kN loads. The area above the specimen sheet is open to allow access for an x-ray system (see figure), which uses the sin2 method to measure the lattice strain, and therefore the stresses in situ. The current configuration allows tilting in only one direction, so measuring the stresses in orthogonal directions requires multiple tests. During Spring 2008 the system is being upgraded to permit multiple axis tilts. The uncertainty of the resulting stress measurements is on the order of several MPa.

